


Table of contents
Hey everyone in our previews blog we learn what are the different tools and platforms out there to install Kubernetes and use it. we install the minikube in our local system. In this blog, we will get to know more about minikube as a local Kubernetes cluster and kubectl which manage local Kubernetes clusters and cloud Kubernetes
if you haven’t read my previews blog then please go check that out first then come back to this on because you will the basic knowledge of what minikube is. And you can also check out my whole Kubernetes services that are going on right now
Let’s with little bit recap what minikube is
Minikube
Minikube is a utility you can use to run Kubernetes (k8s) on your local machine. It creates a single node cluster contained in a virtual machine (VM). This cluster lets you demo Kubernetes operations without requiring the time and resource-consuming installation of full-blown K8s.
This flexibility enables you to try out Kubernetes deployments, perform development tasks, or test configurations easily. Minikube is especially useful for those new to k8s since it enables you to gain familiarity with basic concepts.
Accessing Minikube
Any healthy running Kubernetes cluster can be accessed via any one of the following methods:
- Command Line Interface (CLI) tools and scripts
- Web-based User Interface (Web UI) from a web browser
- APIs from CLI or programmatically
These methods are applicable to all Kubernetes clusters.
Command Line Interface (CLI)
kubectl is the Kubernetes Command Line Interface (CLI) client to manage cluster resources and applications. It is very flexible and easy to integrate with other systems, therefore it can be used standalone, or part of scripts and automation tools. Once all required credentials and cluster access points have been configured for kubectl, it can be used remotely from anywhere to access a cluster.
We will be using kubectl extensively to deploy applications, manage and configure Kubernetes resources.
Web-based User Interface (Web UI)
The Kubernetes Dashboard provides a Web-based User Interface (Web UI) to interact with a Kubernetes cluster to manage resources and containerized applications. While not as flexible as the kubectl CLI client tool, it is still a preferred tool to users who are not as proficient with the CLI.

Kubernetes Dashboard User Interface
APIs
The main component of the Kubernetes control plane is the API Server, responsible for exposing the Kubernetes APIs. The APIs allow operators and users to directly interact with the cluster. Using both CLI tools and the Dashboard UI, we can access the API server running on the control plane node to perform various operations to modify the cluster's state. The API Server is accessible through its endpoints by agents and users possessing the required credentials.
Below, we can see the representation of the HTTP API directory tree of Kubernetes:
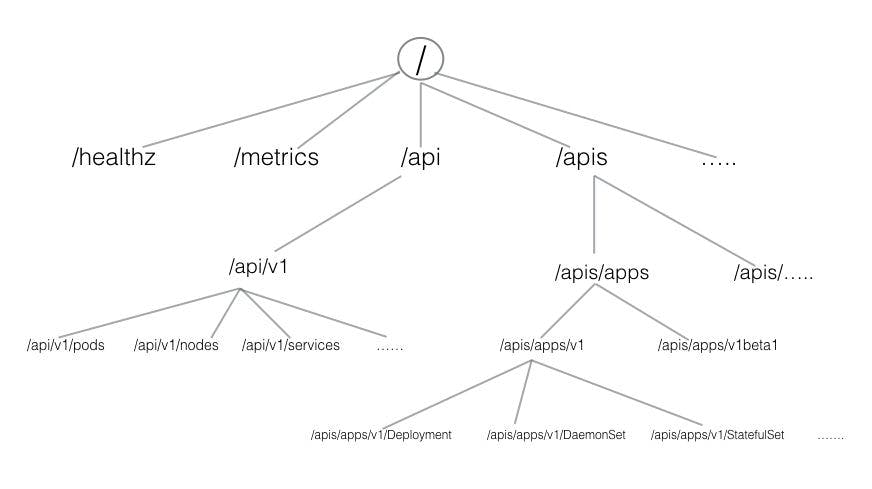
HTTP API Directory Tree of Kubernetes
HTTP API directory tree of Kubernetes can be divided into three independent group types:
- Core group (/api/v1)This group includes objects such as Pods, Services, Nodes, Namespaces, ConfigMaps, Secrets, etc.
- Named groupThis group includes objects in /apis/$NAME/$VERSION format. These different API versions imply different levels of stability and support:Alpha level - it may be dropped at any point in time, without notice. For example, /apis/batch/v2alpha1.Beta level - it is well-tested, but the semantics of objects may change in incompatible ways in a subsequent beta or stable release. For example, /apis/certificates.k8s.io/v1beta1. Stable level - appears in released software for many subsequent versions. For example, /apis/networking.k8s.io/v1.
- System-wideThis group consists of system-wide **API endpoints, like /healthz, /logs, /metrics, /ui**, etc.
We can access an API Server either directly by calling the respective API endpoints, using the CLI tools, or the Dashboard UI.
kubectl
kubectl allows us to manage local Kubernetes clusters like the Minikube cluster, or remote clusters deployed in the cloud. It is generally installed before installing and starting Minikube, but it can also be installed after the cluster bootstrapping step.
A Minikube installation has its own kubectl CLI installed and ready to use. However, it is somewhat inconvenient to use as the kubectl command becomes a subcommand of the minikube command. Users would be required to type longer commands, such as minikube kubectl -- -o --option, instead of just kubectl -o --option. While a simple solution would be to set up an alias, the recommendation is to run the kubectl CLI tool as a standalone installation.
Once separately installed, kubectl receives its configuration automatically for Minikube Kubernetes cluster access. However, in different Kubernetes cluster setups, we may need to manually configure the cluster access points and certificates required by kubectl to securely access the cluster.
There are different methods that can be used to install kubectl listed in the Kubernetes documentation. For best results, it is recommended to keep kubectl within one minor version of the desired Kubernetes release.
Installing kubectl on Linux
To install kubectl on Linux, follow the instruction below extracted from the official installation guide.
Download and install the latest stable kubectl binary:
$ curl -LO "https://dl.k8s.io/release/$(curl -L -s https://dl.k8s.io/release/stable.txt)/bin/linux/amd64/kubectl"
$ sudo install -o root -g root -m 0755 kubectl /usr/local/bin/kubectl
Where https://dl.k8s.io/release/stable.txt aims to display the latest Kubernetes stable release version.
NOTE: To download and set up a specific version of kubectl (such as v4.2.0), issue the following command: $ curl -LO dl.k8s.io/release/v4.2.0/bin/linux/amd64/ku...
The installed version can be verified with:
$ kubectl version --client
A typical helpful post-installation configuration is to enable shell autocompletion for kubectl. It can be achieved by running the following sequence of commands:
$ sudo apt install -y bash-completion
$ source /usr/share/bash-completion/bash_completion
$ source <(kubectl completion bash)
$ echo 'source <(kubectl completion bash)' >>~/.bashrc
Installing kubectl on macOS
There are two methods to install kubectl on macOS - manually and using the Homebrew package manager. Next, we present both installation methods extracted from the official installation guide.
To manually install kubectl, download the latest stable binary, make it executable and move it to the PATH with the following commands:
$ curl -LO "https://dl.k8s.io/release/$(curl -L -s https://dl.k8s.io/release/stable.txt)/bin/darwin/amd64/kubectl"
$ chmod +x ./kubectl
$ sudo mv ./kubectl /usr/local/bin/kubectl
$ sudo chown root: /usr/local/bin/kubectl
Where https://dl.k8s.io/release/stable.txt aims to display the latest Kubernetes stable release version.
*NOTE: To download and setup a specific version of kubectl (such as v4.2.0), issue the following command instead
$ curl -LO https://dl.k8s.io/release/v4.2.0/bin/darwin/amd64/kubectl
*NOTE: The commands above download the kubectl package for systems equipped with Intel processors. For newer macOS systems equipped with Apple Silicon download the required package by replacing /amd64/ with /arm64/ in the download commands above.
To install kubectl with Homebrew package manager, issue the following command:
$ brew install kubectl
or
$ brew install kubernetes-cli
The installed version can be verified with:
$ kubectl version --client
A typical helpful post-installation configuration is to enable shell autocompletion for kubectl on your favorite shell (bash, fish, zsh).
Installing kubectl on Windows
To install kubectl, we can download the binary directly or use curl from the CLI. Once downloaded the binary needs to be added to the PATH.
Direct download link for v1.23.5 binary: https://dl.k8s.io/release/v1.23.5/bin/windows/amd64/kubectl.exe.
*NOTE: Obtain the latest kubectl stable release version number from the link below, and if needed, edit the download link for the desired binary version from above: https://dl.k8s.io/release/stable.txt.*
Use the curl command (if installed) from the CLI:
curl -LO "https://dl.k8s.io/release/v1.23.5/bin/windows/amd64/kubectl.exe"
Once downloaded, append the kubectl binary folder to the PATH.
*NOTE: Docker Desktop for Windows adds its own version of kubectl to PATH. If you have installed Docker Desktop before, you may need to place your PATH entry before the one added by the Docker Desktop installer or remove the Docker Desktop's kubectl.*
The installed version can be verified with:
$ kubectl version --client
A typical helpful post-installation configuration is to enable shell autocompletion for kubectl for PowerShell.
kubectl Configuration File
To access the Kubernetes cluster, the kubectl client needs the control plane node endpoint and appropriate credentials to be able to securely interact with the API Server running on the control plane node. While starting Minikube, the startup process creates, by default, a configuration file, config, inside the .kube directory (often referred to as the kubeconfig), which resides in the user's home directory. The configuration file has all the connection details required by kubectl. By default, the kubectl binary parses this file to find the control plane node's connection endpoint, along with the required credentials. Multiple kubeconfig files can be configured with a single kubectl client. To look at the connection details, we can either display the content of the ~/.kube/config file (on Linux) or run the following command (the output is redacted for readability):
$ kubectl config view

apiVersion: v1
clusters:
- cluster:
      certificate-authority: /home/student/.minikube/ca.crt
      server: https://192.168.99.100:8443
  name: minikube
contexts:
-  context:
        cluster: minikube
        user: minikube
    name: minikube
current-context: minikube
kind: Config
preferences: {}
users:
-  name: minikube
    user:
        client-certificate:
/home/student/.minikube/profiles/minikube/client.crt
        client-key:
/home/student/.minikube/profiles/minikube/client.key
The kubeconfig includes the API Server's endpoint server: https://192.168.99.100:8443 and the minikube user's client authentication key and certificate data.
Once kubectl is installed, we can display information about the Minikube Kubernetes cluster with the kubectl cluster-info command:
$ kubectl cluster-info

Kubernetes master is running at https://192.168.99.100:8443
KubeDNS is running at https://192.168.99.100:8443/api/v1/namespaces/kube-system/services/kube-dns:dns/proxy

To further debug and diagnose cluster problems, use 'kubectl cluster-info dump'.
You can find more details about the kubectl command line options here.
Although for the Kubernetes cluster installed by Minikube the ~/.kube/config file gets created automatically, this is not the case for Kubernetes clusters installed by other tools. In other cases, the config file has to be created manually and sometimes re-configured to suit various networking and client/server setups.
Kubernetes Dashboard
The Kubernetes Dashboard provides a web-based user interface for Kubernetes cluster management. Minikube installs the Dashboard as an addon, but it is disabled by default. Prior to using the Dashboard we are required to enable the Dashboard addon, together with the metrics-server addon, a helper addon designed to collect usage metrics from the Kubernetes cluster. To access the dashboard from Minikube, we can use the minikube dashboard command, which opens a new tab in our web browser displaying the Kubernetes Dashboard, but only after we list, enable required addons, and verify their state:
$ minikube addons list
$ minikube addons enable metrics-server
$ minikube addons enable dashboard
$ minikube addons list
$ minikube dashboard
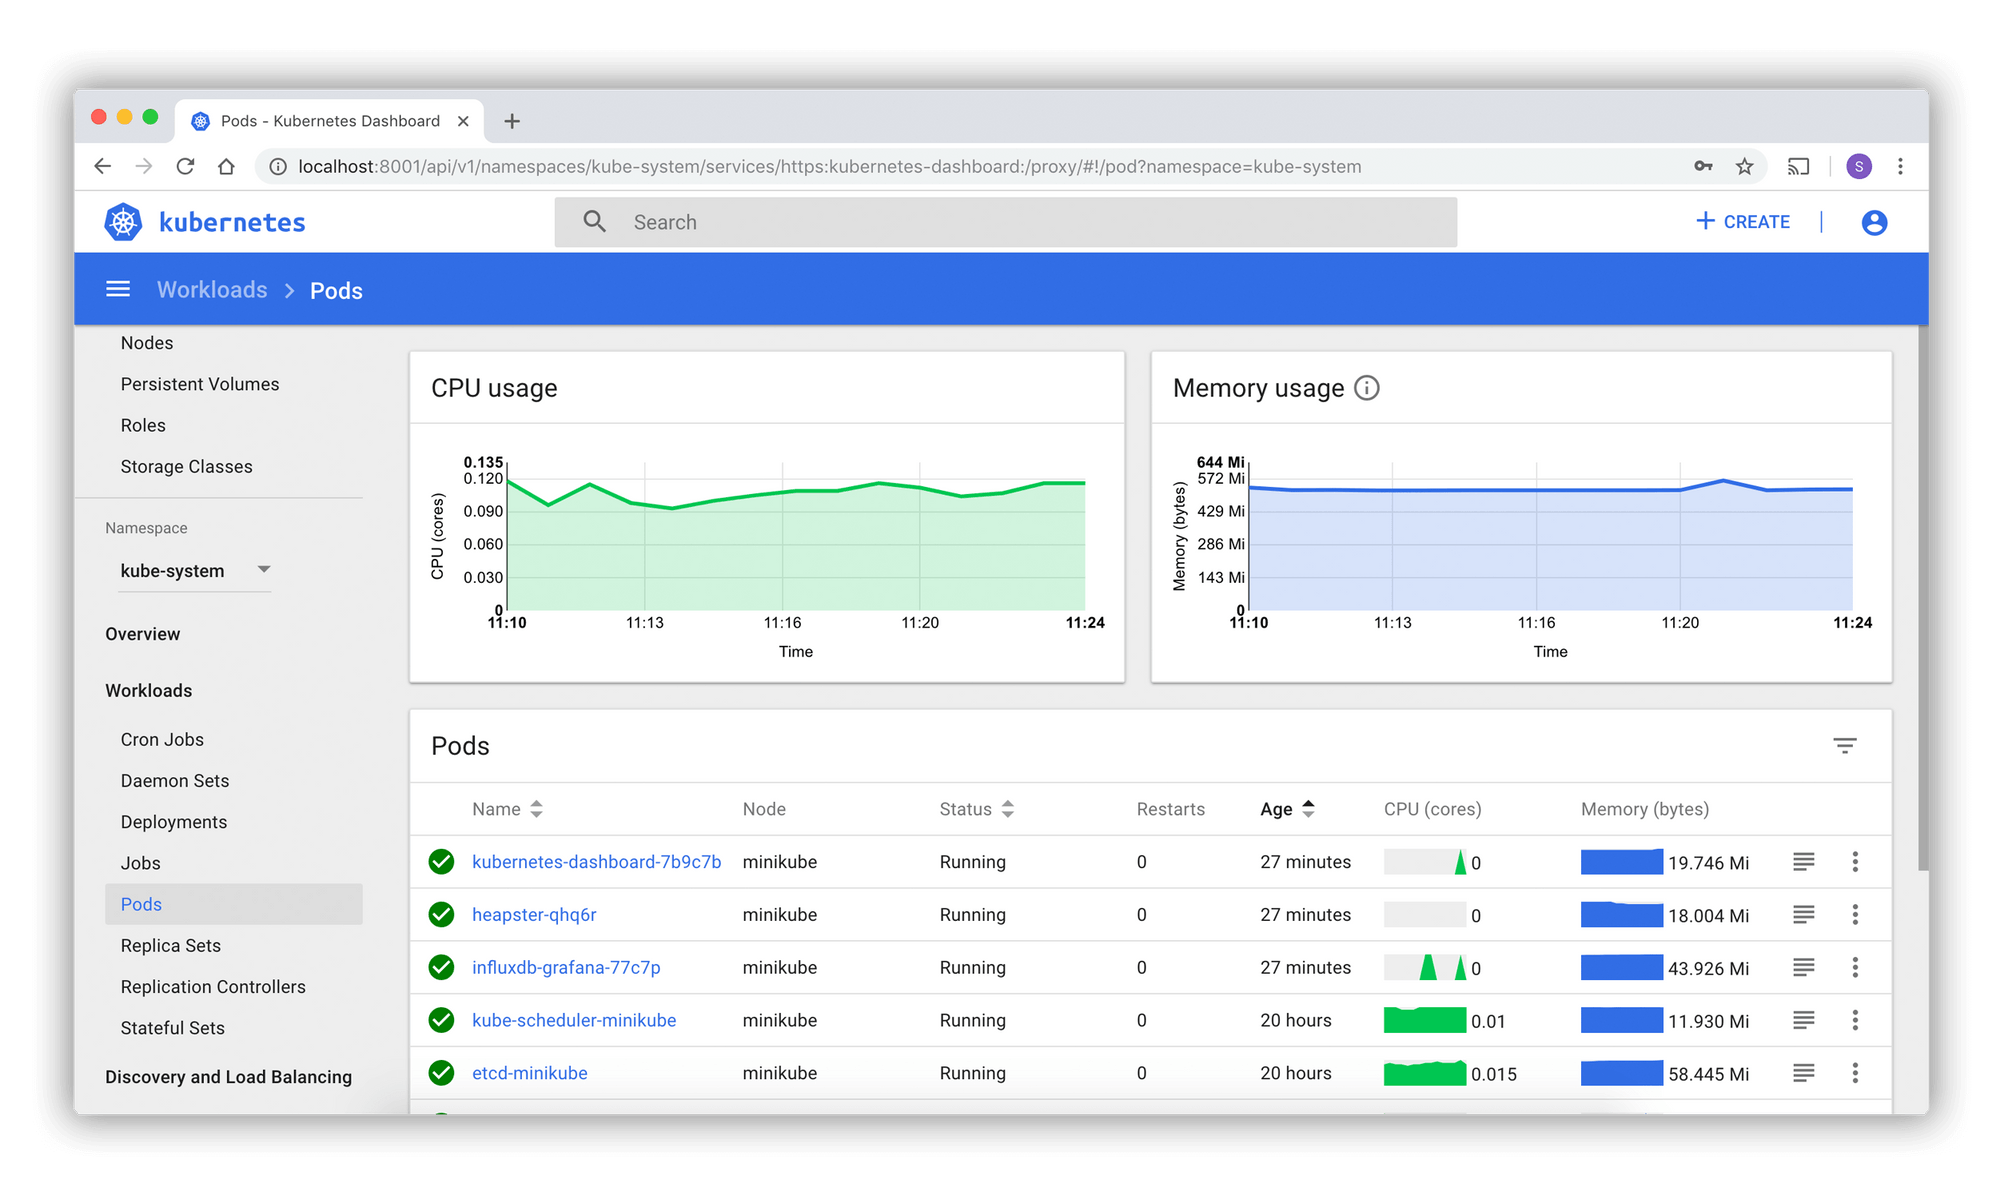
Kubernetes Dashboard User Interface
*NOTE: In case the browser is not opening another tab and does not display the Dashboard as expected, verify the output in your terminal as it may display a URL for the Dashboard (together with some Error messages). If the URL is not displayed, we can request it to be displayed with the following command:
$ minikube dashboard --url
Copy and paste the displayed URL in a new tab of your browser. Depending on your terminal's features you may be able to just click or right-click the URL to open directly in the browser.
After a logout/login or a reboot of your workstation the expected behavior may be observed (where the minikube dashboard command directly opens a new tab in your browser displaying the Dashboard).
APIs with 'kubectl proxy'
Issuing the kubectl proxy command, kubectl authenticates with the API server on the control plane node and makes services available on the default proxy port 8001.
First, we issue the kubectl proxy command:
$ kubectl proxy

Starting to serve on 127.0.0.1:8001
It locks the terminal for as long as the proxy is running, unless we run it in the background (with kubectl proxy &).
When kubectl proxy is running, we can send requests to the API over the localhost on the default proxy port 8001 (from another terminal, since the proxy locks the first terminal when running in foreground):
$ curl http://localhost:8001/

{
 "paths": [
      "/api",
      "/api/v1",
      "/apis",
      "/apis/apps",
      ......
      ......
      "/logs",
      "/metrics",
      "/openapi/v2",
      "/version"
   ]
}
With the above curl request, we requested all the API endpoints from the API server. Clicking on the link above (in the curl command), it will open the same listing output in a browser tab.
We can explore several path combinations with curl or in a browser as well, such as:
http://localhost:8001/api/v1

http://localhost:8001/apis/apps/v1

http://localhost:8001/healthz

http://localhost:8001/metrics
APIs with Authentication
When not using the kubectl proxy, we need to authenticate to the API Server when sending API requests. We can authenticate by providing a Bearer Token when issuing a curl, or by providing a set of keys and certificates.
A Bearer Token is an access token which is generated by the authentication server (the API Server on the control plane node) and given back to the client. Using that token, the client can connect back to the Kubernetes API Server without providing further authentication details, and then, access resources.
Retrieve the token:
$ TOKEN=$(kubectl describe secret -n kube-system $(kubectl get secrets -n kube-system | grep default | cut -f1 -d ' ') | grep -E '^token' | cut -f2 -d':' | tr -d '\t' | tr -d " ")
Retrieve the API Server endpoint:
$ APISERVER=$(kubectl config view | grep https | cut -f 2- -d ":" | tr -d " ")
Confirm that the APISERVER stored the same IP as the Kubernetes control plane IP by issuing the following two commands and comparing their outputs:
$ echo $APISERVER

https://192.168.99.100:8443
$ kubectl cluster-info

Kubernetes control plane is running at https://192.168.99.100:8443 ...
Access the API Server using the curl command, as shown below:
$ curl $APISERVER --header "Authorization: Bearer $TOKEN" --insecure

{
  "paths": [
      "/api",
      "/api/v1",
      "/apis",
      "/apis/apps",
      ......
      ......
      "/logs",
      "/metrics",
      "/openapi/v2",
      "/version"
  ]
 }
Instead of the access token, we can extract the client certificate, client key, and certificate authority data from the .kube/config file. Once extracted, they can be encoded and then passed with a curl command for authentication. The new curl command would look similar to the example below. Keep in mind, however, that the below example command would only work with the encoded client certificate, key and certificate authority data.
$ curl $APISERVER --cert encoded-cert --key encoded-key --cacert encoded-ca
THE END
Thank You for reading my blog. Hope you understand what I'm trying to explain. If You like what are you reading then please follow my page and also on twitter and do share it.