


Welcome to our latest blog post, where we delve into the world of Kubernetes Deployment. Whether you're new to Kubernetes or a seasoned pro, this guide will equip you with the skills to deploy applications effectively. Let's get started!
What is Deployment?
Deployment, in a general sense, means the process of making a software application available and running on a computer or server so that users can access and use it. It involves tasks like installing the software, configuring it, and ensuring it works correctly.
deployment in the context of Kubernetes is like managing a group of virtual workers to make sure your applications are always running, updated, and available. It's like having a team of robots that handle your software, ensuring it runs smoothly, and automatically replacing parts if something goes wrong, all without you having to do it manually.
How Deployment Works?
Let's Understand how deployments work. What happens when you deploy a yaml file with kubectl commands?
kubectl:- You typically use the kubectl command-line tool to apply the YAML file. The kubectl tool communicates with the Kubernetes API server to make changes to the cluster.
API Server Validation: When you run kubectl apply -f yourfile.yaml, kubectl sends a request to the Kubernetes API server. The API server performs validation on the YAML file to ensure it is well-formed and adheres to the Kubernetes resource schema.
Resource Creation or Update:
If the resource does not exist: If the resource described in the YAML file does not exist in the cluster, the API server will create it based on the specifications in the file.
If the resource already exists: If a resource with the same name already exists in the cluster, the API server will update it to match the specifications in the YAML file. This update is performed in a declarative manner, meaning Kubernetes will make changes to the existing resource to make it match the desired state defined in the YAML file.
Resource Controller: After the API server processes the request, it communicates with the appropriate resource controller (e.g., Deployment Controller, StatefulSet Controller, Service Controller) to manage the resource's lifecycle and maintain the desired state.
For example, in your, we applied a Deployment YAML, the Deployment Controller will ensure that the specified number of replicas are running, manage rolling updates, and maintain the desired state of the pods.
Scheduler (for Pods): If the YAML file includes Pod specifications, the Scheduler may come into play. The Scheduler determines which worker nodes should run the pods based on factors like resource availability, constraints, and affinity rules. It schedules the pods onto suitable nodes.
Kubelet (on Worker Nodes): The Kubelet on each worker node monitors the node's state and communicates with the API server. When it receives instructions to run pods on its node, it ensures that the containers specified in the pods' specifications are started and maintained.
Container Runtime: The Container Runtime (e.g., Docker) is responsible for pulling container images from a registry, creating containers, and managing their lifecycle on the worker nodes.
Networking: Kubernetes sets up networking so that pods can communicate with each other and access services. This includes assigning IP addresses, handling DNS resolution, and network policies.
Load Balancing (for Services): If the YAML file defines a Service resource, the Kubernetes Service Controller manages load balancing and provides a stable IP address and DNS name for accessing pods.
Resource Status: Kubernetes continuously monitors the status of resources and updates their status in the cluster's etcd database. You can check the resource status using kubectl get or kubectl describe.
Logging and Monitoring: Kubernetes can be integrated with logging and monitoring solutions to provide visibility into the cluster's health and the applications running within it.
Error Handling and Rollbacks: If there are errors during resource creation or updates, Kubernetes provides mechanisms for error handling and can automatically roll back changes to maintain the desired state.
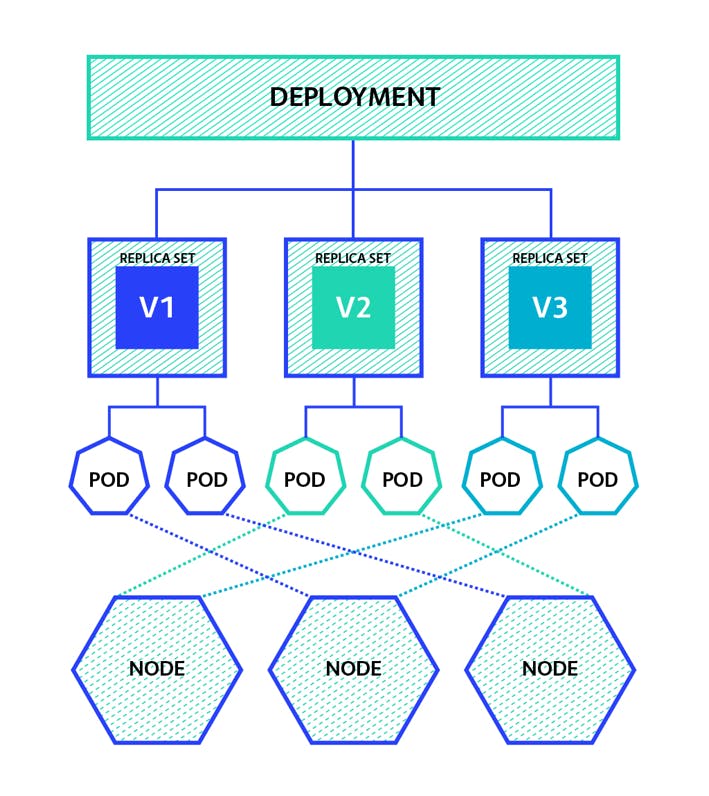
All this happens when you deploy any yaml file. I hope the image helps to understand how things work when you deploy a deployment.
How to write a deployment file?
Let's write a deployment file that will deploy a container in a pod. First, create a yaml file.
apiVersion: apps/v1
kind: Deployment
metadata:
  name: nginx-deployment1
  labels:
    app: nginx
spec:
  replicas: 3
  selector:
    matchlabels:
      app: nginx
template:
  metadata:
    labels:
      app: nginx
  spec:
    containers:
    - name: webserver1
      image: nginx:1.6
      ports:
       - containerPort:80
    - name: database-server
      image: mysql-3.2
      ports:
       - containerPort:3306
Now you have created the yaml file let's start writing it.
apiversion:- this field refers to the API, which is being used to create the Kubernetes object being defined. Kubernetes provides various APIs that enable you to create different Kubernetes objects. For example, apiVersion: v1 contains many of the core objects.
kind: Deployment:- kind allows you to specify which type of Kubernetes object you aim to define. The kind is deployment because we have created a deployment file. if you want to create a service file then the kind will be services, etc.
metadata:- the metadata field provides the unique properties for that specific object. This could include the name, uuid, and namespace fields. The values specified for these fields provide us with context for the object, and they can be referred to by other objects
spec:- The spec field allows us to define what’s expected from the object that we’re building. It consists of all the key-value pairs specific to defining the operation of the object. Just like the object itself, the specifications of the object depend on the apiVersions specified before
template:- YAML Templating aims to reduce the number of YAML files we have to write and manage by reusing them across your Kubernetes application
In the template section, we have created a spec and in that spec, we have given the containers.
All the Commands for deployments
Now let's see some Commands that we will be using in every deployment.
kubectl get deployment – List one or more deployments.
kubectl describe deployment <deployment_name> – Display the detailed state of one or more deployments.
kubectl edit deployment <deployment_name> – Edit and update the definition of one or more deployments on the server.
kubectl create deployment <deployment_name> – Create a new deployment.
kubectl delete deployment <deployment_name> – Delete deployments.
kubectl rollout status deployment <deployment_name> – See the rollout status of a deployment.
kubectl set image deployment/<deployment name> <container name>=image:<new image version> – Perform a rolling update (K8S default), and set the image of the container to a new version for a particular deployment.
kubectl rollout undo deployment/<deployment name> – Roll back a previous deployment.
kubectl replace --force -f <configuration file> – Perform a replace deployment — Force replace, delete and then re-create the resource.
THE END
That's all for today we learned a lot today if you have any questions please let me I will answer that. One more suggestion please write down those commands on a piece of paper that will be always on your table so that whenever you need it you can refer from that.
I hope you have read my previous blog in which I explained how you can deploy an NGINX in Kubenete so this time you have to deploy the yaml file that I have created in this blog which has 2 containers.